This is a step-by-step tutorial on how to make your own luxury DIY Christmas wreath on a budget that is sure to impress your friends!!
Have you ever noticed those beautiful wreaths you see in luxury hotels and department stores during the holidays?
They are absolutely gorgeous!
I once looked up how much those are and let me just tell you, it is outrageous! In fact, a study was done on how much the average family spends on Christmas decor each year, and it's a staggering $230 on decorations alone!
We simply have to have a better option for amazing Christmas decor on a budget!
Therefore, instead, I spent hours and hours researching how to make my own luxurious Christmas wreath. After lots of trial and error, I came up with a foolproof strategy to make my own luxury holiday wreaths at home for very little money!
In this post, I'm breaking down exactly how to create a luxury Christmas wreath on a budget.
DISCLOSURE: THIS POST MAY CONTAIN AFFILIATE LINKS, MEANING THAT AS AN AMAZON ASSOCIATE, I MAY RECEIVE A SMALL COMMISSION AT NO COST TO YOU IF YOU DECIDE TO MAKE A QUALIFYING PURCHASE THROUGH MY LINKS. THIS HELPS ME RUN THIS SITE TO OFFER FREE CONTENT. THANK YOU SO MUCH FOR YOUR SUPPORT.
DIY Christmas Wreath Tutorial
I know this isn't my typical post, but given that all of us are in the money-saving mode, I figured it was both appropriate and helpful for my readers!
My friends and neighbors always comment on how beautiful my holiday wreaths are and even tell me I should sell them. I just do it for fun, but it made me realize that others are interested in learning how it's done!
How Much Are Non-DIY Luxury Wreaths?
Have you ever noticed the luxurious wreaths in department stores and hotels?
If you've looked into purchasing them, you'd find that they are SUPER expensive at $500-$5000 per wreath or more! Yikes!!
I always admired the beautiful holiday wreaths in department stores and hotels, but I never realized I could make my own until a few years ago.
It's actually super simple to do and a blast…plus it won't break the bank!
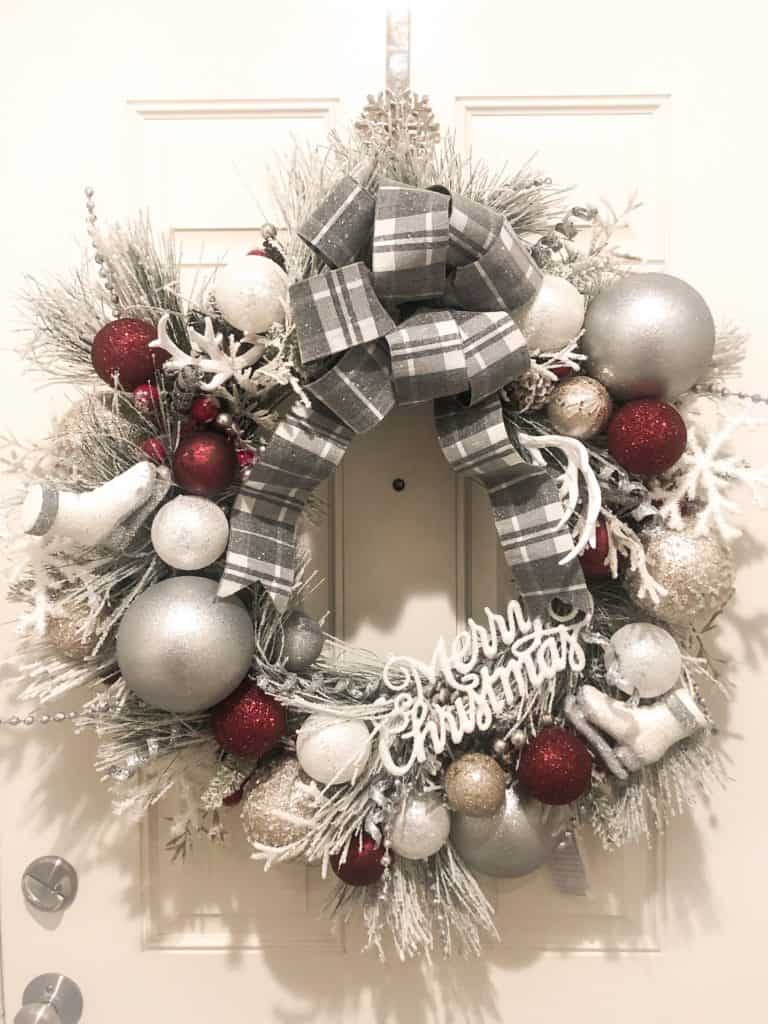
I'm going to show you exactly how to make a do-it-yourself luxury holiday wreath like the one I made below.
Related Articles on Budget Home Decor:
- How to Make Your Bed Feel like a LUXURY HOTEL Bed for CHEAP
- 15 Cheap DIY Home Decor Ideas You Need to Try
- How to Hang a Light Without the Cord Showing for Under $40
Items Needed to Make A Christmas Wreath
1.) Frosted Basic Plain Wreath
You can use any size wreath, but I used a Frosted 28-inch wreath. A 24-inch size wreath is a typical size for a front door. Mine is extra-large (which also makes it hard to find a wreath holder by the way).
If you'd like a non-frosted wreath, you can go with that as well!
You can also flock your non-frosted wreath to make it frosted (details on that below). I like to use real flock so that it looks like real snow and lasts longer.
Here are some great wreath options:
The snow flock I'd recommend for plain wreaths to make them frosty is below. I find that real flock works best over the spray cans. This is the industrial-grade stuff they use in the Christmas manufacturing sites. I find the spray can snow just comes off after the season, or sometimes during. It also doesn't look as real.
2.) Hot Glue Gun and Glue Gun Sticks
You'll need a hot glue gun, but don't worry because they're super cheap (and I mean super cheap)!
Plus, you'll end up using this so much in your life so for just a few dollars, it's a great investment!
This one gives you both the glue gun and the glue sticks so it's an insanely good deal for less than the cost of lunch!
3.) Shatterproof Ornaments
Okay, now on to the fun stuff. You'll need some ornaments!
Here are 3 things to think about when picking out ornaments for your DIY Christmas wreath:
a.) Pick shatterproof ornaments ONLY. This just makes things simple later so you don't have to worry about glass breaking.
b.) Pick a color scheme of 3-4 different colored ornaments. This is most important as colors will add the biggest difference.
c.) Choose different sizes of ornaments. This will give the wreath dimension and add to more visual appeal.
Reminder: Make sure they are shatterproof! Do NOT get glass ornaments. You don't want clean up, cuts, and wasted money. Plus, the wreath needs to be able to store well without getting ruined so you can use it year after year. =)
For my do-it-yourself wreath, I decided to use the colors silver, burgundy, white, and gold. I used the following sizing:
- 3 extra-large silver ornaments
- 3 large gold/silver metallic ornaments
- 7 medium burgundy size ornaments
- 6 medium white ornaments
- 3 small silver ornaments
- 3 small gold ornaments.
Medium Ornaments in Burgundy:
Small Ornaments in Silver:
I find it's most cost-effective to go with a bundle of ornaments that come in a variety pack. Here are some great deals on a variety of ornament balls to keep costs low:
4.) Other “Fix-Ins”
The “fix-ins” are my FAVORITE part of the wreath! I refer to “fix-ins” as everything else that isn't an ornament or a ribbon!
For example, I used the following fix-ins:
- 4-5 snow flakes
- berries
- 2 ice skates
- 2 white antlers
- some pine cones
- glitter sticks
- glitter spirals
Have fun with it! Get things that make you happy and throw them on your wreath!
Making a fall wreath? Do pumpkins!
Winter? Little mittens, pinecones, ice skates, moccasins, etc!
Summer? Popsicles, fruit, and beach balls!
I found a lot of my “fix in” decor at Hobby Lobby or Michaels because it's the cheapest there. Buy a few of each item to place in your wreath!
I also included some great Amazon choices below. I love the packages that have the ornaments and the fix-ins all in one to make it even easier (and cheaper)!
5.) Ribbon with Wire
Pick out a ribbon you like that matches your wreath decor. I included mine below as well as some other cute options. Make sure yours has wire in it!


6.) Floral Wire
Floral Wire will be used to make your bow, but it has so many uses beyond this project!
The wire is super cheaper and you'll use it in the future. Trust me!
In fact, you can use it for hanging Christmas lights, DIY craft projects at home and so much more!

7.) “Phrase” Decor (optional)
If you'd like, pick up a little word emblem. I used “Merry Christmas.” These can be found at Michaels or Hobby Lobby.
8.) Wreath Hanger for Door (optional)
This will be used to hang your new wreath on your door (if you'd like). This one is a good deal.
If it's going up on a wall, you can hang it up with a nail, depending on where you want to put it!

Okay, so now that you've got all of your items, let's get to work!
Related Articles on Saving Money:
- How to Make Your Bed Feel like a LUXURY HOTEL Bed for CHEAP
- 15 Cheap DIY Home Decor Ideas You Need to Try
- How to Hang a Light Without the Cord Showing for Under $40
How to Make a DIY Christmas Wreath
1.) Spread the Branches- “Make it Fluffy”
Take your new plain wreath and spread all of the branches out so that they aren't squished on top of each other.
When doing so, make it look nice and full!
If you have a plain wreath and want to flock it to make it look snowy, you can flock it after you spread all the branches around. The wider the better here, ladies!
2.) Flock It (Optional)
If you'd like to flock your wreath, I recommend using powder instead of the spray cans. The spray cans don't last as long and don't look as real.
If you're using the powder, get a spray bottle of water or just wet the branches and drizzle the powder over the wreath with your hands until you reach the desired effect. Then, spritz with water again to set the powder.
I usually start with a spray bottle and by the end, I'm fully dumping cups of water onto the wreath to get as much powder on it as possible.
3.) Place the Largest Ornaments
Okay, now it's time to put your ornaments on your wreath.
Place your biggest ornament balls in different areas of the wreath first.
Hint: Don't glue anything yet until you get to the last step.
4.) Place the Medium and Small Ornaments
Now, take your second largest ornament balls and place them in random areas all over the wreath.
Continue repeating these steps until all of the traditional ornament balls are on the wreath.
Make sure to space out the colors so that they are all placed randomly.
5.) Place Your “Fix-Ins” Elements
This is where it gets really fun!
All the playful “fix in” elements you found can now be placed onto your wreath (ice skates, antlers, pine cones, berries, glittery spirals, etc).
Put them in different areas like you did with the ornaments. Get creative and have fun!
This is when I love playing with glittery elements. I place glittery spirals and twists all over my wreath for added pop!
6.) Make your Bow!
I made a youtube video for you guys below. Beware, it is ROUGH (I am certainly not a YouTuber), but hopefully, it helps you see how it's done! =P
Here's how to make a Christmas bow with wired ribbon:
1.) Take your wire ribbon and start about 9 inches from the end.
2.) Make a loop on one side and a loop on the other side.
3.) Keep your thumb and pointer finger in between the loops.
4.) You'll want to continue doing this until you have 4 loops on one side and 4 loops on the other.
5.) Then, take your floral wire and wrap it around the center (where your thumb and pointer finger were).
6.) Lastly, tie it off so it's firm in place.
7. Now fluff out your bow to the desired look. Make sure it looks “fluffy” and that you can't see the center floral wire.
For an added touch, cut both ends of the ribbon tails into a carrot top (^).
Place your bow on your wreath. I usually place it on the top or at the 10 pm mark.
Lastly, I like to make the ribbon tails look like they are flowing, but I place them exactly where I want them and use glue (not yet, but at the end).
7.) Review Your DIY Wreath
Now take a step back and look at your wreath. If you need to add anything, go ahead and have fun with it! Add it in and take a look!
8.) Glue it Down
If it looks good, it's time to glue everything down! Take your glue gun and just make little dime-sized amounts on your elements to glue into the branches on your wreath.
Hint: It doesn't take much glue and the glue dries SUPER FAST so you'll want to move quickly.
How to Make Christmas Wreaths with Ribbon
TA-DA! You're done with your luxury holiday wreath!
You now have a beautiful DIY Christmas wreath like the department stores that didn't cost an arm and a leg!!! I'd LOVE to see what you've created.
Tag me on social media @financialcookbook with a picture of the wreath you created! I love to see everyone's creativity!
Related Articles about Budget Home Decor
Related Content:
- 8 Best Home Improvements to Increase Value (on a Budget)
- How to Hang a Light Without the Cord Showing for Under $40
- Free Home Management Printables You Need for Emergencies and Maintenance
- How to Make Your Bed Look Like Pottery Barn (On a Budget)
- Luxury DIY Christmas Wreath on a Budget: Sure to Impress
- How to Make Custom DIY Curtains on a $1 Budget
- 15 Cheap DIY Home Decor Ideas You Need to Try
- How to Refinance A Mortgage: Ultimate Beginner’s Guide
- First Home Mortgage? 3 Things You Need to Look for to Score the Best Deal


Thank you!! I’m going to give it a go!
I’ve been surfing online more than three hours lately,
yet I never discovered any attention-grabbing article like yours.
It’s beautiful price sufficient for me. Personally, if all website owners and bloggers made good content
as you did, the net will be a lot more useful than ever
before.