This post is about how to make custom DIY curtains for $1 to make your home look expensive on a budget. It's super easy, quick, and cheap!
You know me. I'm all about making my home look expensive on a budget. In fact, I'm all about doing everything on a budget.
I know that no matter how rich I get in life, I will ALWAYS wait for the sale, shop at HomeGoods, buy the knock off dupe, and wait for the avocado prices to go down. It's just who I am. =)
However, anyone that doesn't know me personally would have NO IDEA how frugal I am. My lifestyle looks expensive, but it's all secretly on a budget.
My friends still tease me that I had a laptop I duct taped together all through college because I wanted to wait until it fully went out to replace it.
I also still use an eight year old iphone.
It's just against who I am to replace things that aren't broken. I invest that money into the stock market instead so that it can continue to make money for me.
Anyways, back to the regularly scheduled programming.
I LOVE making my home look expensive on a budget. Today's hack is about how to make custom curtains for $1.
Yes, you read that right. CUSTOM DIY CURTAINS FOR $1!
Related:
- How to Hang a Light Without the Cord Showing for Under $40
- 15 Cheap DIY Home Decor Ideas You Need to Try
- Eco-Friendly Ways to Save Money: Ultimate List
- 9 Money Saving Tips to Increase Your Savings Immediately
Curtains can add SO MUCH to a space! They really change the look of a room.
Therefore, this is one of my favorite hacks to make your home look more expensive. It's important to also follow my important tips on how to hang the curtains. I'll go over both in today's post.
Let's get started.
Jump to:
How to Hang Curtains to Make Your Home Look Expensive
First, let's discuss how to hang your curtains to make the room look expensive.
The key here is that we want to make the room look as large as possible. These simple tricks will help you accomplish that.
1. Hang the Curtains 3-4 Inches from the Ceiling
You'll want to hang your curtains the proper height.
Ever seen a curtain rod that's right above a window? It looks silly and makes the room look smaller.
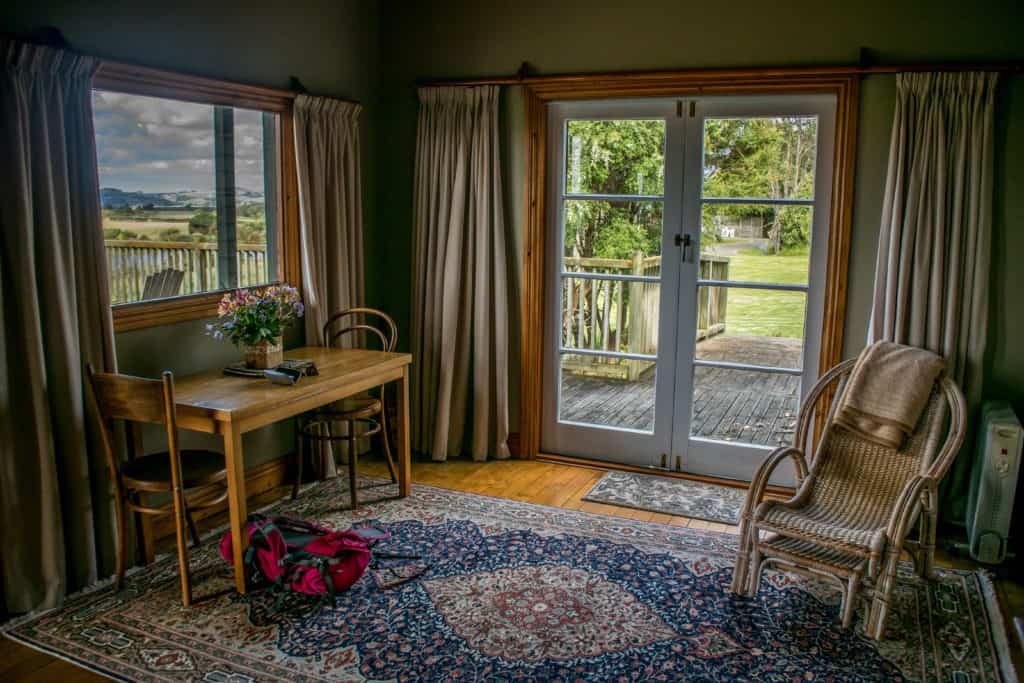
Have you also seen curtains hung way too high? That also doesn't give the expensive look you want.
For normal windows that have a ceiling 1-2 feet above the window, I always place my curtains 3-4 inches from the top of the ceiling. This way, my room looks larger and more grand.
For spaces that have a larger area above the windows, aim to place the curtain rod in the middle between the window and the ceiling.
2. Make Sure the Curtains Reach to the Floor
This step is VERY important.
When you hang the curtains, make sure you get ones long enough to reach the floor. They shouldn't be dragging on the floor and they shouldn't be too high. (Side note: you'll need to get them longer to allow for the hem we're going to do.)
They should barely “kiss” the floor.
Too short of curtains will visually make your room look smaller and it won't have that expensive look.
Longer curtains will collect dust and don't make a room look custom.
3. Get Curtain Panels that are Double the Width of the Window
I like to get curtains that are double the size of the width of the window because it makes my room look more expensive.
When I want to close the curtains, they still have pleating so they don't look like I'm stretching them to cover the window. You want a fine balance.
Just getting curtain panels larger than the window itself will certainly help achieve the more expensive look, even if you can't find ones that are double in size!
4. Get a Curtain Rod That is Larger Than Your Windows
Find a curtain rod that's larger (in width) than your windows.
If your curtain rod is the same size as the window, your curtain panels will block the window. You want as much natural light as possible when the curtains are open.
Therefore, my rule of thumb is to have the curtain rod go about 6-9 inches past the window on each side to give my rooms a more expensive look.
This way, your curtains can be pulled to the side and allow as much natural light in as possible, making the room appear larger.
How to Make Custom DIY Curtains for $1
Alright, let's get into how you make your curtains custom on a budget.
For a quick video tutorial to see what we're doing, check out my 1 minute video here.
1. Measure Your Space
As I mentioned above, for normal windows, you'll want curtains that go from the floor to 3-4 inches below your ceiling. ADD AN ADDITIONAL 3-4 INCHES TO THIS MEASUREMENT TO ACCOUNT FOR YOUR CUSTOMIZED HEMMING!
Take down this measurement for length.
If you have windows that are REALLY far from the ceiling, hang your curtains in the middle (between the window and the ceiling).
(I usually need 102 inch curtains to allow for hemming.)
DO NOT FORGET TO ADD 3-4 INCHES FOR THE CUSTOMIZED HEMMING YOU WILL BE DOING!!
To account for this, you could always just measure floor to ceiling. However, I'd add on another 1-2 inches for good measure in case you make a mistake. =)
So rule of thumb here:
-Take the floor to ceiling measurement and add 2 inches!
Do we have it?
For the width, measure the width of your window and multiply by 2. This measurement doesn't need to be as exact if you can't find it exact in the store. Just get as close as you can. =)
2. Find Curtains
I find a lot of my curtains at IKEA, believe it or not. I'm usually not a big IKEA girl, but they actually have really good QUALITY curtains for a good price. However, the biggest reason I go there for curtains though is because I can find them LONG ENOUGH!!
It's hard to find long curtains these days! I don't know why!
My rooms are normal height, but I guess not everyone likes curtains that are customized for the room.
IKEA gets us though and they've got long curtains.
I also get long curtains at HomeGoods or on Amazon. Pleated curtains are my favorite because it makes the rooms look more expensive.
I always like to use light, bright curtains to brighten up the room.
Here are some of my Amazon favorites:


3. Get a Curtain Rod
Find a curtain rod you like that's 6-8 inches longer on each side of the window.
Measure the width of the window and add 12-16 inches.
This doesn't need to be exact, but I'd say plan for at least an additional 10 inches as you want enough room for your curtain to not cover the window when it's pulled back.
I do not recommend getting curtain rods at IKEA. The IKEA rod I had years ago when I was in college broke and scratched really quickly.
Instead, I find curtain rods on Amazon and at HomeGoods. However, these three are my favorites and are the ones I use in every single room of my house. I'm OBSESSED with the look against white curtains! I always get compliments too!
In rooms that have black hardware (knobs, furniture, cabinet handles, etc), I use the black ones. In rooms that are more feminine with roses and candles, I use the nickel ones.


4. Get Iron On Tape
Here's the fun part to making your DIY Curtains.
Get iron on hemming tape. I grab mine at IKEA for $2 or on Amazon for around $3. I linked the one I use from Amazon below and here's the one I use from IKEA.
It's SUPER CHEAP (under $3) and this is what you'll use to make your custom curtains!

5. Measure Your Curtains to the EXACT Measurement Needed
Now take the EXACT measurement you want your curtains to be (floor to 3 inches below ceiling) and mark that on your curtains.
Mark with a pin.
6. Place the Hemming Tape and Iron
Now, it's time to officially make your DIY curtains.
First, fold the bottom of the curtain up to the pins and pin all the way down the width of the curtain.
I like to go in sections so I don't mess up.
Now place your hemming tape along the bottom of the curtain and the top of where you want that hem placed (where the pins are). Sandwich the tape.
Then, take out a few pins at a time and start ironing those parts. I do this on a normal ironing board. Take your time as you want your curtains to be even on the bottom.
If you need to keep taking out a measuring tape, go ahead and do that!
7. Iron the Whole Curtain
After all my hemming tape is in place and has been ironed, I go ahead and iron the hem really well.
I want it to be crisp and look as though I bought the curtain that way.
Ironing will make ALL THE DIFFERENCE in your curtains, aside from placing it correctly.
Iron the entire curtain so that it doesn't have a single wrinkle or crease!
That's all!
Custom DIY Curtains for $1
Viola! You now have custom DIY curtains that you made for $1!
They will elevate your space and make your home look more expensive while staying on a budget!
I LOVE DIY tricks to make my home look more luxurious. Let me know if you try this and tag me @financialcookbook on any social media to show me the result! Can't wait to see it! =)
Related Content:
- 8 Best Home Improvements to Increase Value (on a Budget)
- How to Hang a Light Without the Cord Showing for Under $40
- Free Home Management Printables You Need for Emergencies and Maintenance
- How to Make Your Bed Look Like Pottery Barn (On a Budget)
- Luxury DIY Christmas Wreath on a Budget: Sure to Impress
- How to Make Custom DIY Curtains on a $1 Budget
- 15 Cheap DIY Home Decor Ideas You Need to Try
- How to Refinance A Mortgage: Ultimate Beginner’s Guide
- First Home Mortgage? 3 Things You Need to Look for to Score the Best Deal


Leave a Reply